Installing a 200 WOG (Working Operating Gauge) globe valve is a task that requires careful planning and execution. As a supplier of 200 WOG globe valves, I have seen firsthand the importance of proper installation to ensure the valve functions effectively and safely. In this blog post, I will guide you through the step-by-step process of installing a 200 WOG globe valve, covering everything from preparation to testing.
Preparation
Before you begin the installation process, it is essential to gather all the necessary tools and materials. Here's a list of what you'll need:
- 200 WOG globe valve
- Pipe wrenches
- Teflon tape
- Pipe cutter
- Deburring tool
- Safety goggles
- Gloves
It's also important to ensure that the valve you have chosen is the correct size and type for your application. The 200 WOG rating indicates the maximum working pressure the valve can handle, so make sure it is suitable for the pressure requirements of your system.
Step 1: Shut Off the System
The first step in installing a 200 WOG globe valve is to shut off the system. This means turning off the water supply or any other fluid that the valve will be controlling. Make sure to relieve any pressure in the system by opening a downstream valve or bleed valve. This will prevent any accidents or injuries during the installation process.
Step 2: Measure and Cut the Pipe
Once the system is shut off and depressurized, you can measure and cut the pipe where the valve will be installed. Use a pipe cutter to make a clean, straight cut. After cutting the pipe, use a deburring tool to remove any sharp edges or burrs from the inside and outside of the pipe. This will ensure a proper seal when the valve is installed.


Step 3: Apply Teflon Tape
Before installing the valve, apply Teflon tape to the male threads of the pipe. Wrap the tape around the threads in a clockwise direction, making sure to cover the entire threaded area. This will help create a watertight seal and prevent leaks.
Step 4: Install the Valve
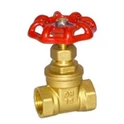
Carefully thread the valve onto the pipe, using a pipe wrench to tighten it. Make sure to align the valve in the correct direction, as indicated by the arrow on the valve body. The arrow shows the direction of flow through the valve. Tighten the valve until it is snug, but be careful not to overtighten, as this can damage the valve or the pipe.
Step 5: Connect the Other End of the Valve
Once the valve is installed on one end of the pipe, repeat the process for the other end. Measure and cut the pipe, apply Teflon tape, and thread the valve onto the pipe. Use a pipe wrench to tighten the connection, making sure it is secure.
Step 6: Check for Leaks
After the valve is installed, turn on the system and check for leaks. Look for any signs of water or fluid leaking from the valve connections. If you notice any leaks, use a pipe wrench to tighten the connections further. If the leaks persist, you may need to remove the valve and reapply the Teflon tape or replace the valve.
Step 7: Test the Valve
Once you have confirmed that there are no leaks, test the valve to make sure it is functioning properly. Open and close the valve several times to ensure that it moves smoothly and that the flow of fluid can be controlled effectively. If the valve does not operate correctly, you may need to adjust it or replace it.
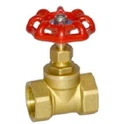
Types of 200 WOG Globe Valves
As a supplier, we offer a variety of 200 WOG globe valves to meet different needs. For example, we have the PPR Brass Globe Valve, which is made of high-quality brass and is suitable for use in PPR pipe systems. It offers excellent corrosion resistance and durability.
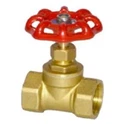
Another popular option is the Round Handwheel Brass Globe Valve 1/2". This valve features a round handwheel for easy operation and is commonly used in small to medium-sized plumbing systems.
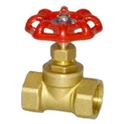
We also have the United Brass Globe Valve, which is known for its reliable performance and long service life. It is suitable for a wide range of applications, including industrial and commercial systems.
Conclusion
Installing a 200 WOG globe valve is a relatively straightforward process, but it requires attention to detail and proper technique. By following the steps outlined in this blog post, you can ensure that your valve is installed correctly and functions effectively. If you have any questions or need further assistance, please do not hesitate to contact us. We are here to help you with all your valve needs. Whether you are a DIY enthusiast or a professional plumber, we have the right 200 WOG globe valve for your project. Contact us today to discuss your requirements and start your procurement process.
References
- "Valve Handbook" by Valve Manufacturers Association
- "Plumbing Installation Guide" by National Association of Plumbing-Heating-Cooling Contractors