A leaking brass globe valve can be a real nuisance, not only causing water or fluid wastage but also potentially leading to damage in your plumbing system. As a trusted brass globe valve supplier, we understand the importance of being able to address these issues promptly and efficiently. In this blog post, we'll guide you through the process of repairing a leaking brass globe valve, ensuring that your system remains in top - notch condition.


Understanding the Brass Globe Valve
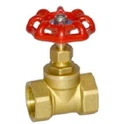
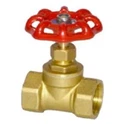
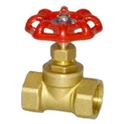
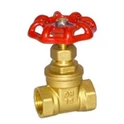
Before delving into the repair process, it's essential to understand what a brass globe valve is and how it works. A brass globe valve is a type of valve used to regulate the flow of fluid in a pipeline. It has a spherical body with an opening inside it, where a disk is positioned. By turning the valve stem, the disk moves up and down, controlling the amount of fluid that can pass through the valve. The primary advantage of brass globe valves is their durability and resistance to corrosion, making them a popular choice in various industries.
We offer a wide range of brass globe valves, including the United Brass Globe Valve, PPR Brass Globe Valve, and 200 WOG Globe Valve. Each of these valves is designed to meet specific requirements, ensuring that you can find the perfect fit for your application.
Signs of a Leaking Brass Globe Valve
Identifying a leaking valve is the first step in the repair process. There are several signs that can indicate a brass globe valve is leaking:
- Visible Water or Fluid: If you notice water or fluid puddles around the valve, it's a clear sign of a leak. This could be due to a faulty packing, a damaged valve seat, or a cracked valve body.
- Increased Water or Fluid Bills: A hidden leak can cause significant wastage over time, resulting in higher bills. If you notice an unexplained increase in your usage, it's worth checking your valves.
- Hissing or Dripping Sounds: A hissing sound can indicate a pressure leak, while a dripping sound suggests a visible leak. These sounds can often be heard when the valve is in use or even when it's supposed to be closed.
Tools and Materials Needed
Before you start the repair process, gather the necessary tools and materials. Here's a list of what you'll need:
- Adjustable wrench
- Screwdriver
- Replacement packing material (such as PTFE tape or packing rings)
- Valve seat grinder (if necessary)
- Replacement valve seat (if necessary)
- Replacement valve stem (if necessary)
- Sealant
- Safety goggles
- Gloves
Step - by - Step Repair Process
Step 1: Turn off the Supply
The first and most crucial step is to turn off the water or fluid supply to the valve. This can usually be done by locating the main shut - off valve for your plumbing system. Make sure to open a faucet downstream of the valve to relieve any remaining pressure in the pipes.
Step 2: Remove the Valve Bonnet
Use an adjustable wrench to loosen and remove the nuts securing the valve bonnet. The valve bonnet is the part that covers the valve stem. Once the nuts are removed, carefully lift the bonnet off the valve body.
Step 3: Inspect the Packing
The packing is the material that seals the valve stem and prevents leakage. Check the packing for signs of wear, damage, or drying out. If the packing is worn, remove it using a screwdriver.
Step 4: Replace the Packing
If the packing needs to be replaced, wind PTFE tape around the valve stem in a clockwise direction. Make sure to apply the tape evenly and tightly. If you're using packing rings, insert them into the packing gland one by one, ensuring they're properly seated.
Step 5: Inspect the Valve Seat
The valve seat is where the valve disk sits when the valve is closed. Check the valve seat for signs of damage, such as scratches or pits. If the valve seat is damaged, you may need to use a valve seat grinder to smooth it out. In some cases, you may need to replace the valve seat entirely.
Step 6: Check the Valve Stem
Inspect the valve stem for any signs of damage or corrosion. If the stem is damaged, it may need to be replaced. A damaged valve stem can cause the valve to leak or not function properly.
Step 7: Reassemble the Valve
Once you've completed all the necessary repairs and inspections, carefully reassemble the valve. Place the valve bonnet back on the valve body and tighten the nuts using an adjustable wrench. Make sure not to overtighten the nuts, as this can damage the valve.
Step 8: Turn on the Supply
After reassembling the valve, turn on the water or fluid supply. Check for any signs of leakage around the valve. If there are no leaks, the repair was successful.
Tips for Prevention
To prevent future leaks in your brass globe valve, consider the following tips:
- Regular Maintenance: Schedule regular maintenance checks for your valves. This can help identify and address potential issues before they become major problems.
- Use the Right Valve: Make sure you're using the right type of brass globe valve for your application. Different valves have different pressure and temperature ratings, so it's important to choose the one that's suitable for your needs.
- Proper Installation: Ensure that the valve is installed correctly. Improper installation can lead to leaks and other issues.
Conclusion
Repairing a leaking brass globe valve doesn't have to be a daunting task. By following the steps outlined in this guide, you can effectively address the issue and restore your valve to proper working condition. As a leading brass globe valve supplier, we're committed to providing you with high - quality valves and the expertise to keep your systems running smoothly.
If you're in the market for brass globe valves or need further advice on valve repair and maintenance, don't hesitate to contact us. We're here to help you find the best solutions for your specific requirements. Let's work together to ensure the efficiency and reliability of your plumbing and fluid control systems.
References
- "Valve Handbook: Types, Selection, and Sizing". Author unknown. Publisher: Industrial Press.
- "Plumbing for Dummies". Author: David Carnes. Publisher: Wiley.